Steps 1: Need a server
There are several methods to get a server up and running and I've probably used them all.
Basically what is needed is a local server stack with either Apache or Nginx (engine X ) with a current version of PHP and a database engine either MySql or MariaDB and a current copy of WordPress from www.wordpress.org
If, the local server is for WordPress only, then using a WordPress desktop solution like FlyWheel, Bitnami or ServerPress will work fine and is a lot simpler that building from scratch. See other available server options
I recommend Local by FlyWheel as it is free, will automatically build a custom server stack with either Apache or Nginx, with options for different versions of PHP and can create as many complete ready to use WordPress sites as needed and even includes the creation of the databases. It's easy to use and also has the option to create sites as a multi-site all in the same environment.

Another advantages:
It can provide an external link to view in different devices and also show off the site to others
FlyWheel also offers managed WordPress hosting and Local by FlyWheel makes taking the development sites live very simple.
Step 2: Add a New Site
From the FlyWheel file menu or ⌘N add a new site.
Site setup will ask for a Site Name - any name will do. By default FlyWheel creates its own directory created in the user directory called local/sites. This can be changed under the Advanced Options just browse to and select or create a directory of choice. I recommend adding the folder to the /Users/username/Sites folder as it keeps all site files in the Mac OS X default folder but an additional directory in the user directory is not a big issue. Use the blueprint option.
Next option will be for the Preferred or Custom Server build - If using Flywheel to Host live site stay with Preferred.
Third screen will setup WordPress user, password and default email also under the ADVANCED OPTIONS can install a multi site.
Step 3: Optional
If you want additional database users Open the Database Tab and access the database to add new user and password

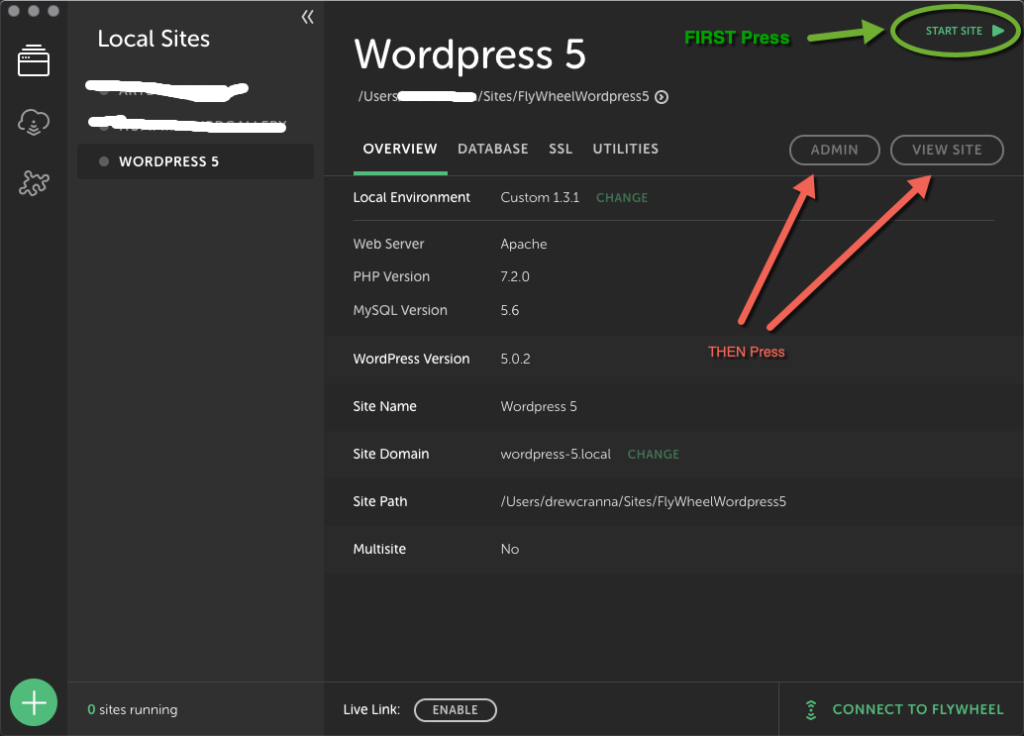
Step 4: Start & Open the site
It's as simple as pressing the START SITE button and once started enter either the ADMIN or VIEW SITE button.
Step 4: Log In and Start Customizing
Assuming you pressed ADMIN this will take you to the WordPress standard login screen and after login will open the admin ( backend ) and it's ready to start customizing.